EPOXY PROCEDURES (II)
EPOXY PROCEDURES (WINKYPEDIA)
Epoxy injection is an economical method of repairing non-moving cracks in concrete walls, slabs, columns and piers and is capable of restoring the concrete to its pre-cracked strength. Prior to doing any injection it is necessary to determine the cause of the crack. If the source of cracking has not been determined and remedied, the concrete may crack again. (VERIFY WITH MOHR’S CIRCLE, (esfuerzos principales perpendiculars al esfuerzo principal)
Materials
• CI-LV and CI-SLV for repair of hairline cracks (0.002") and those up to 1⁄4" in width.
• CI-LV FS and CI-LPL for repair of fine to medium-width cracks (suggested width range: 1/64"–1⁄4
• CI-GV for repair of medium-width cracks (suggested width range: 3⁄32"–1⁄4").
• Crack-Pac® injection epoxy for repair of fine to medium non-structural cracks (suggested width range: 1/64"–1⁄4
• Crack-Pac Flex-H2O polyurethane crack sealer for repair of fine- to medium-width cracks (suggested width range: 1⁄32"–1/4").
• CIP-LO, CIP-F and ETR are recommended for paste-over of crack surface and installation of injection ports. ET-HP may also be used as a substitute.
• E-Z-Click™ injection ports, fittings and other suitable accessories.
 Estimating Guide for Epoxy Crack Injection
Clean the crack and the surface surrounding it to allow the paste-over to bond to sound concrete. At a minimum, the surface to receive paste-over should be brushed with a wire brush. Oil, grease or other surface contaminant must be removed in order to allow the paste-over to bond properly. Take care not to impact any debris into the crack during cleaning. Using clean, oil-free compressed air, blow out the crack to remove any dust, debris or standing water. Best results will be obtained if the crack is dry at the time of injection. If water is continually seeping from the crack, the flow must be stopped in order for epoxy injection to yield a suitable repair. Other materials such as polyurethane resins may be required to repair an actively leaking crack.
For many applications, additional preparation is necessary in order to seal the crack. Where a surfacing material has been removed using an acid or chemical solvent, prepare the crack as follows:
1. Using clean, compressed air, blow out any remaining debris and liquid.
2. Remove residue by high-pressure washing or steam cleaning.
3. Blow any remaining water from the crack with clean compressed air.
If a coating, sealant or paint has been applied to the concrete, it must be removed before placing the paste-over epoxy. Under the pressure of injection, these materials may lift and cause a leak. If the surface coating is covering the crack, it may be necessary to route out the opening of the crack in a “V” shape using a grinder in order to get past the surface contamination.
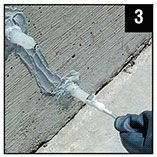
Sealing of the Crack and Attachment of E-Z-Click™ Injection Ports
1. To adhere the port to the concrete, apply a small amount of paste-over around the bottom of the port base. Place the port at one end of the crack and repeat until the entire crack is ported. As a rule of thumb, injection ports should be placed 8" apart along the length
Do not allow paste-over to block the port or the crack under it, this is where epoxy must enter the crack.
Estimating Guide for Epoxy Crack Injection
Clean the crack and the surface surrounding it to allow the paste-over to bond to sound concrete. At a minimum, the surface to receive paste-over should be brushed with a wire brush. Oil, grease or other surface contaminant must be removed in order to allow the paste-over to bond properly. Take care not to impact any debris into the crack during cleaning. Using clean, oil-free compressed air, blow out the crack to remove any dust, debris or standing water. Best results will be obtained if the crack is dry at the time of injection. If water is continually seeping from the crack, the flow must be stopped in order for epoxy injection to yield a suitable repair. Other materials such as polyurethane resins may be required to repair an actively leaking crack.
For many applications, additional preparation is necessary in order to seal the crack. Where a surfacing material has been removed using an acid or chemical solvent, prepare the crack as follows:
1. Using clean, compressed air, blow out any remaining debris and liquid.
2. Remove residue by high-pressure washing or steam cleaning.
3. Blow any remaining water from the crack with clean compressed air.
If a coating, sealant or paint has been applied to the concrete, it must be removed before placing the paste-over epoxy. Under the pressure of injection, these materials may lift and cause a leak. If the surface coating is covering the crack, it may be necessary to route out the opening of the crack in a “V” shape using a grinder in order to get past the surface contamination.
Sealing of the Crack and Attachment of E-Z-Click™ Injection Ports
1. To adhere the port to the concrete, apply a small amount of paste-over around the bottom of the port base. Place the port at one end of the crack and repeat until the entire crack is ported. As a rule of thumb, injection ports should be placed 8" apart along the length
Do not allow paste-over to block the port or the crack under it, this is where epoxy must enter the crack.

 2. Using a putty knife or other paste-over tool, generously work paste-over along the entire length of the crack. Take care to mound the paste-over around the base of the port to approximately 1/4" thick extending 1" out from the base of the port and to work out any holes in the material. It is recommended that the paste-over should be a minimum of 3/16" thick and 1" wide along the crack. Insufficient paste-over will result in leaks under the pressure of injection. If the crack passes completely through the concrete element, seal the back of the crack, if possible. If not, injection epoxy may be able to run out the back side of the crack, resulting in an ineffective repair
 3. Allow the paste-over to harden before beginning injection. Note: CIP-LO and ETR are a fast cure and when manually mixed may harden prematurely if left in a mixed mass on the mixing surface while installing ports. Spreading paste-over into a thin film (approximately 1/8") on the mixing surface will slow curing by allowing the heat from the reaction to dissipate.
Injection Procedure for CI-SLV, CI-LV, CI-LV FS, CI-LPL, CI-GV and Crack-Pac® Injection Epoxy
1. Follow cartridge preparation instructions on the cartridge label. Verify the material flowing from the Opti-Mix® mixing nozzle is a uniform and consistent color.
2. Attach the E-Z-Click™ fitting to the end of the nozzle by pushing the tubing over the barbs at the end of the nozzle. Make sure that all ports are pushed in to the open position.
3. Attach the E-Z-Click™ injection fitting to the first E-Z-Click™ port until it clicks into place. Make sure that the heads of all the ports are pushed in to the open position. In vertical applications, begin injection at the lowest port and work your way up. In a horizontal application start at one end of the crack and work your way to the other end.
3. Allow the paste-over to harden before beginning injection. Note: CIP-LO and ETR are a fast cure and when manually mixed may harden prematurely if left in a mixed mass on the mixing surface while installing ports. Spreading paste-over into a thin film (approximately 1/8") on the mixing surface will slow curing by allowing the heat from the reaction to dissipate.
Injection Procedure for CI-SLV, CI-LV, CI-LV FS, CI-LPL, CI-GV and Crack-Pac® Injection Epoxy
1. Follow cartridge preparation instructions on the cartridge label. Verify the material flowing from the Opti-Mix® mixing nozzle is a uniform and consistent color.
2. Attach the E-Z-Click™ fitting to the end of the nozzle by pushing the tubing over the barbs at the end of the nozzle. Make sure that all ports are pushed in to the open position.
3. Attach the E-Z-Click™ injection fitting to the first E-Z-Click™ port until it clicks into place. Make sure that the heads of all the ports are pushed in to the open position. In vertical applications, begin injection at the lowest port and work your way up. In a horizontal application start at one end of the crack and work your way to the other end.
 Inject epoxy into the first port until it will no longer flow into the crack. If epoxy shows at the next port and the first port still accepts material, close the second port and continue to inject into the first port until it accepts no more epoxy. Continue closing ports where epoxy appears until the first port refuses epoxy.
When the first port reaches the point of refusal, brace the base of the port and pull out gently on the head of the port to close it. Pulling too hard may dislodge the port from the surface of the concrete, causing a leak. Depress the metal tab on the head of the E-Z-Click fitting and remove it from the port.
Inject epoxy into the first port until it will no longer flow into the crack. If epoxy shows at the next port and the first port still accepts material, close the second port and continue to inject into the first port until it accepts no more epoxy. Continue closing ports where epoxy appears until the first port refuses epoxy.
When the first port reaches the point of refusal, brace the base of the port and pull out gently on the head of the port to close it. Pulling too hard may dislodge the port from the surface of the concrete, causing a leak. Depress the metal tab on the head of the E-Z-Click fitting and remove it from the port. 1. Go to the last port where epoxy appeared while injecting the first port, open it, and continue injection at this port. If the epoxy has set up and the port is bonded closed, move to the next clean port and repeat the process until every portion of the crack has refused epoxy.
While this method may appear to leave some ports uninjected, it provides maximum pressure to force the epoxy into the smaller areas of the crack. Moving to the next port as soon as epoxy appears will allow the epoxy to travel along the wider parts of the crack to the next ports rather than force it into the crack before it travels to the next ports
Injection Tips
• If using a pneumatic dispensing tool, set the tool at a low setting when beginning injection and increase pressure if necessary to get the epoxy to flow.
• For narrow cracks it may be necessary to increase the pressure gradually until the epoxy begins to flow. It may also be necessary to wait a few minutes for the epoxy to fill the crack and travel to the next port.
• If desired, once the injection epoxy has cured, remove the injection ports and paste-over. Epoxy paste-over can be removed with a chisel, scraper, or grinder. The paste-over can be simply peeled off if CIP-F is used. Using a heat gun to soften the epoxy is recommended when using a chisel or scraper.
• Mixing nozzles can be used for multiple cartridges as long as the epoxy does not harden in the nozzle. For injection epoxies in side-by-side cartridges, care must be taken to ensure the level of material is the same on both parts of the cartridge. This can be done by checking for air in the cartridge and the positions of the wipers in the back of the cartridge. If the liquid levels are off by more than 1⁄8", then Step 1 from the injection
Troubleshooting for Crack-Pac Flex-H2O Crack Sealer
Polyurethane is flowing into the crack, but not showing up at the next port.
This can indicate there is not enough water present to react with the polyurethane and generate foam. Introduce water into the port and continue to inject. Introduce water into subsequent ports prior to injection. This can indicate that either the crack expands and/or branches off under the surface of the concrete. Continue to inject and fill these voids. This can indicate that the crack either expands and/or branches off under the surface of the concrete. Continue to inject and fill these voids. In situations where the crack penetrates completely through the concrete element, and the back-side of the concrete element cannot be sealed (e.g., basement walls, or footings with backfill), longer injection time may not force the epoxy to the next port. This most likely indicates that epoxy is running out the unsealed back side of the crack. In this case, the application may require a gel viscosity injection epoxy (CI-GV) or may not be suitable for injection repair without excavation and sealing of the back side of the crack.
Back pressure is preventing polyurethane from flowing.
This can indicate several situations:
• The crack is not continuous and the portion being injected is full.
• The port is not aligned over the crack properly.
• The crack is blocked by debris.
• Polyurethane is leaking from the pasted-over crack or around injection ports.
• Stop injecting. If using a fast cure paste-over material (CIP-F, CIP-LO or ETR), wipe off the leaking polyurethane with a cotton cloth and reapply the paste over material. Wait a approximately 10–15 minutes to allow the paste-over to begin to harden. If the leak is large (e.g., the port broke off of the concrete surface), it is a good idea to wait approximately 30 minutes, or longer as necessary, to allow the paste-over to cure more completely. Check to see that the paste-over is hard before reinjecting or the paste-over or ports may leak.
• Another option for small leaks is to clean off the injection adhesive and use paraffin or crayon to seal the holes.
• More polyurethane is being used than estimated.
• This may indicate there is not enough water present to react with the polyurethane and generate foam. Introduce water into the port and continue to inject. Introduce water into subsequent ports prior to injection. This may indicate that the crack either expands or branches off below the surface. Continue to injectand fill these voids
• Less polyurethane is being used than estimated.
• This may indicate that the crack is shallower than originally thought, or the polyurethane is not penetrating the crack sufficiently before moving to the next port.
• Gravity-Feed Procedure
Some horizontal applications where complete penetration is not a requirement can be repaired using the gravity-feed method.
1. Follow cartridge preparation instructions on the cartridge label. Verify that the material flowing from the Optimix® mixing nozzle is a uniform and consistent color.
2. Starting at one end of the crack, slowly dispense epoxy into the crack, moving along the crack as it fills. It will probably be necessary to do multiple passes in order to fill the crack. It is possible that the epoxy will take some time to run into the crack, and the crack may appear empty several hours after the initial application. Reapply epoxy until the crack is filled.
3. In situations where the crack completely penetrates the member (e.g., concrete slab), the material may continue to run through the crack into the subgrade. It may be possible to use a small amount of course, dry sand to act as a barrier for the injection epoxy. Place the sand in the crack to a level no more than 1⁄4" thickness of the member and apply the injection epoxy as described in step 2. The epoxy level will drop as it penetrates the sand, but should cure and provide a seal to the bottom of the crack. Reapply the epoxy until the crack is filled. In some cases, application of sand is impractical or not permitted and epoxy repair may not provide a complete and effective repair. Use of a gel viscosity injection epoxy (CI-GV) may permit a surface repair to the crack with partial penetration
CIRCULO DE MOHR
1. Go to the last port where epoxy appeared while injecting the first port, open it, and continue injection at this port. If the epoxy has set up and the port is bonded closed, move to the next clean port and repeat the process until every portion of the crack has refused epoxy.
While this method may appear to leave some ports uninjected, it provides maximum pressure to force the epoxy into the smaller areas of the crack. Moving to the next port as soon as epoxy appears will allow the epoxy to travel along the wider parts of the crack to the next ports rather than force it into the crack before it travels to the next ports
Injection Tips
• If using a pneumatic dispensing tool, set the tool at a low setting when beginning injection and increase pressure if necessary to get the epoxy to flow.
• For narrow cracks it may be necessary to increase the pressure gradually until the epoxy begins to flow. It may also be necessary to wait a few minutes for the epoxy to fill the crack and travel to the next port.
• If desired, once the injection epoxy has cured, remove the injection ports and paste-over. Epoxy paste-over can be removed with a chisel, scraper, or grinder. The paste-over can be simply peeled off if CIP-F is used. Using a heat gun to soften the epoxy is recommended when using a chisel or scraper.
• Mixing nozzles can be used for multiple cartridges as long as the epoxy does not harden in the nozzle. For injection epoxies in side-by-side cartridges, care must be taken to ensure the level of material is the same on both parts of the cartridge. This can be done by checking for air in the cartridge and the positions of the wipers in the back of the cartridge. If the liquid levels are off by more than 1⁄8", then Step 1 from the injection
Troubleshooting for Crack-Pac Flex-H2O Crack Sealer
Polyurethane is flowing into the crack, but not showing up at the next port.
This can indicate there is not enough water present to react with the polyurethane and generate foam. Introduce water into the port and continue to inject. Introduce water into subsequent ports prior to injection. This can indicate that either the crack expands and/or branches off under the surface of the concrete. Continue to inject and fill these voids. This can indicate that the crack either expands and/or branches off under the surface of the concrete. Continue to inject and fill these voids. In situations where the crack penetrates completely through the concrete element, and the back-side of the concrete element cannot be sealed (e.g., basement walls, or footings with backfill), longer injection time may not force the epoxy to the next port. This most likely indicates that epoxy is running out the unsealed back side of the crack. In this case, the application may require a gel viscosity injection epoxy (CI-GV) or may not be suitable for injection repair without excavation and sealing of the back side of the crack.
Back pressure is preventing polyurethane from flowing.
This can indicate several situations:
• The crack is not continuous and the portion being injected is full.
• The port is not aligned over the crack properly.
• The crack is blocked by debris.
• Polyurethane is leaking from the pasted-over crack or around injection ports.
• Stop injecting. If using a fast cure paste-over material (CIP-F, CIP-LO or ETR), wipe off the leaking polyurethane with a cotton cloth and reapply the paste over material. Wait a approximately 10–15 minutes to allow the paste-over to begin to harden. If the leak is large (e.g., the port broke off of the concrete surface), it is a good idea to wait approximately 30 minutes, or longer as necessary, to allow the paste-over to cure more completely. Check to see that the paste-over is hard before reinjecting or the paste-over or ports may leak.
• Another option for small leaks is to clean off the injection adhesive and use paraffin or crayon to seal the holes.
• More polyurethane is being used than estimated.
• This may indicate there is not enough water present to react with the polyurethane and generate foam. Introduce water into the port and continue to inject. Introduce water into subsequent ports prior to injection. This may indicate that the crack either expands or branches off below the surface. Continue to injectand fill these voids
• Less polyurethane is being used than estimated.
• This may indicate that the crack is shallower than originally thought, or the polyurethane is not penetrating the crack sufficiently before moving to the next port.
• Gravity-Feed Procedure
Some horizontal applications where complete penetration is not a requirement can be repaired using the gravity-feed method.
1. Follow cartridge preparation instructions on the cartridge label. Verify that the material flowing from the Optimix® mixing nozzle is a uniform and consistent color.
2. Starting at one end of the crack, slowly dispense epoxy into the crack, moving along the crack as it fills. It will probably be necessary to do multiple passes in order to fill the crack. It is possible that the epoxy will take some time to run into the crack, and the crack may appear empty several hours after the initial application. Reapply epoxy until the crack is filled.
3. In situations where the crack completely penetrates the member (e.g., concrete slab), the material may continue to run through the crack into the subgrade. It may be possible to use a small amount of course, dry sand to act as a barrier for the injection epoxy. Place the sand in the crack to a level no more than 1⁄4" thickness of the member and apply the injection epoxy as described in step 2. The epoxy level will drop as it penetrates the sand, but should cure and provide a seal to the bottom of the crack. Reapply the epoxy until the crack is filled. In some cases, application of sand is impractical or not permitted and epoxy repair may not provide a complete and effective repair. Use of a gel viscosity injection epoxy (CI-GV) may permit a surface repair to the crack with partial penetration
CIRCULO DE MOHR

 THE REPAIRS ON A STRUCTURAL CONCRETE WILL BE DONE WITH STEEL REINFORCEMENT AND CONCRETE PERPEDICULAR TO THE CRACK (PRINCIPAL STRESS ACCORDING TO MOHR)


Comments
Post a Comment